
Test Azure RemoteApp Hybrid Collections
Azure RemoteApp Hybrid Collections are great when you need to publish a custom set of applications that run in a domain-joined environment and have access to on-premises resources over a Site-to-Site VPN. But testing out a Hybrid Collection can be challenging because you need to:
- Set up an Azure Active Directory tenant that is integrated with your on-premises AD environment
- Set up a Site-to-Site VPN connecting Azure RemoteApp to your on-premises network so that it can access a local Domain Controller
- Add a RemoteApp service account and organizational unit to your AD Domain
- Create a custom template image using a Hyper-V server
In this post, I’ll show you how you can meet these requirements without ever having to touch your on-premises environment. This is a useful scenario for setting up dev/test, prototype and demo environments for Azure RemoteApp Hybrid Collections.
OK, so here’s a diagram of the environment that we’re shooting for:
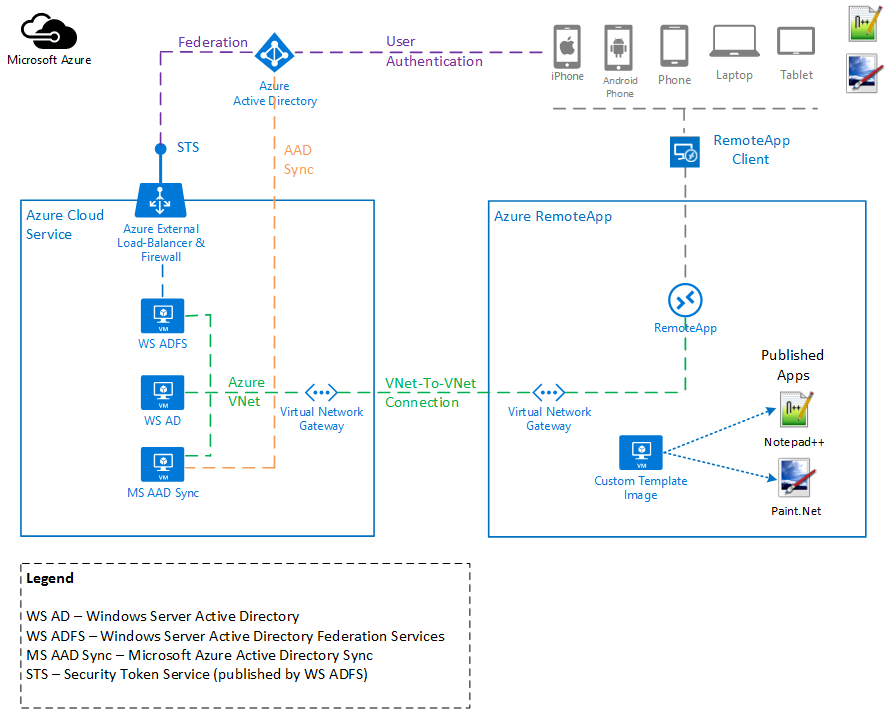
You can download the original Microsoft Visio diagram from here.
As you can see, we’re going to create a custom template image with Notepad++ and Paint.net installed.
First, I’m not going to replicate all the steps for setting up a Hybrid Collection with Azure RemoteApp. You can find a great walk-through in this article - How to create a hybrid collection for RemoteApp. I’m going to focus on the things that are different when building and hosting the entire environment in Azure.
Second, I’m going to assume that you already have a dev/test/demo Azure Active Directory tenant. And I’m going to assume that it’s already integrated with a Windows Server Active Directory environment that you have running on Azure Virtual Machines with a Virtual Network (as depicted in the diagram above). I know this is a big assumption but it is out of the scope of this post to set up that environment. Here are a few resources that will guide you that process if needed:
- Take a look at the article Configuring Active Directory for Azure RemoteApp for information on setting up Azure Active Directory and Windows Server Active Directory infrastructure to work with Azure RemoteApp.
- Azure RemoteApp supports both Directory Sync with Password Sync and Directory Sync with Single Sign-On directory integration scenarios. To enable one of these scenarios, you’re going to need a Windows Server Active Directory, Active Directory Federation Services and Azure Active Directory Sync environment deployed with Azure Virtual Machines and Virtual Networks. Take a look at Guidelines for Deploying Windows Server Active Directory on Azure Virtual Machines for guidance on how to set this up.
So, let’s get started…
###Create the custom template image for Azure RemoteApp###
NOTE: Since publishing this post, the Microsoft Remote Desktop Services team has simplified the process for creating and uploading a custom template image directly from Azure. Check out the following article for guidance - How to create a RemoteApp template image in Azure. If you follow that article then you can skip down to the Configure the VNet-to-VNet Connection section.
The first thing we’re going to do is create a custom template image with Notepad++ and Paint.Net installed. To do this, we’re going to follow most of the steps in this article - How to create a custom template image for RemoteApp. But, instead of using an on-premises Windows Hyper-V Server to create a VM for our custom template image, we’re going to use a Windows Server 2012 R2 image from the Azure Gallery. Here are the steps that you need to perform:
- Spin up a new Azure Virtual Machine based on the latest Windows Server 2012 R2 Datacenter image.
- Make sure its in the same Azure Region (i.e. Location) where you’ll host Azure RemoteApp
- The Basic A1 VM size will work
- You can use an existing Storage Account or create a new one
- Once the VM is up and running, open an RDP session to the server
- Now go back to the article above and start with step “4. Install the Remote Desktop Session Host (RDSH) role and Desktop Experience feature”.
- Complete the remaining steps in that article
- Once you’re done, you’ll have an Azure VM in the Stopped state
- Delete the Azure VM but choose to Keep the attached disks
- Now delete the Azure Disk associated with the VHD. When prompted, select Retain the associated VHD. You may need to wait 10-15 minutes after deleting the VM instance before you can delete the Disk. You need to wait for the Attached to column to become blank meaning it is longer attached to the VM instance.
###Upload the custom template image to your Azure RemoteApp image library###
Next, we need to upload the custom template image to our Azure RemoteApp library. We’re going to follow most of the steps in this article - Upload a custom image. But, instead of uploading the custom template image from our on-premises server, we’re going to upload it from another Azure VM. This will have to be a different VM from the one we used to create the custom template image.
- Spin up another Windows Server 2012 R2 VM instance if you don’t have one running already
- Open an RDP session to the Windows instance
- Make sure you’ve got the latest Azure PowerShell module installed. You can use the Web Platform Installer to install it.
-
Copy the VHD file from your Azure Storage Account to a local disk on the VM. The reason for this is that the RemoteApp Upload Script that you will download from the Azure Management Portal a little later only supports uploading VHD files from local disks, not Azure Blob Storage. You can use something similar to the following Azure PowerShell script to copy the VHD file from Azure Blob Storage to a local disk in the VM. Be patient, copying the VHD file may take an hour or longer.
# Copy the custom template image from Azure Blob Storage to a local path $storageAccountName = <storage account name> $storageAccessKey = <storage access key> $storageContext = New-AzureStorageContext -StorageAccountName $storageAccountName -StorageAccountKey $storageAccessKey $storageContainer = 'vhds' $storageBlob = <blob name .vhd> $fileDestination = 'E:\vhds' Get-AzureStorageBlobContent -Context $storageContext -Container $storageContainer -Blob $storageBlob -Destination $fileDestination - Once the VHD file has finished copying, follow the steps outlined in the article mentioned above.
- At this point, you’ll have a custom template image uploaded into your Azure RemoteApp image library.
Now we’re going to move on to the network configuration…
###Configure the VNet-to-VNet Connection###
Instead of configuring the Azure RemoteApp environment to connect back to an on-premises Domain Controller using a Site-to-Site VPN Connection, we’re going to use a VNet-to-VNet connection to a Domain Controller running on an Azure Virtual Machine connected to a Virtual Network. We’re going to follow most of the steps in this article Configure a VNet to VNet Connection.
There are two Azure Virtual Networks (VNet) that we’re going to connect. The first is the VNet that is connected to the Windows Server Active Directory Domain Controller. We’ll refer to this VNet as the DC VNet. The second is the VNet used by Azure RemoteApp. We’ll refer to this as the RemoteApp VNet. Refer to the diagram above for a visual.
Following the steps in the article referenced above, make sure you configure the following:
- On the DC VNet, create a Local Network that references the RemoteApp VNet IP address range. For now, you can put in any IP address for the VPN Device IP Address. We’ll come back and populate the correct IP address once we provision the RemoteApp VNet.
- Create the Gateway on the DC VNet. Once it has been created, take note of the Gateway IP Address. You’ll need this when creating the RemoteApp VNet.
- Create the RemoteApp VNet
- For the Virtual Network Address Space, specify the same IP address range that you used for the Local Network on the DC VNet.
- For the Local Network Address Space, specify the IP address range of the DC VNet.
- Enter the DNS Server IP Address. In my deployment, I’m running DNS on the Domain Controller so I specified the IP address of the Domain Controller VM itself.
- For the VPN Device IP Address, use the Gateway IP Address from the DC VNet Gateway.
- Once the RemoteApp VNet gets to the Pending VPN configuration state, click the name of the Virtual Network to get to the Dashboard page
- Grab the Azure Gateway IP Address
- Go back to the DC VNet and update the Local Network with the Azure Gateway IP Address from the RemoteApp VNet.
- Finally, you need to set the Shared Key on the VPN gateways. The article referenced above has you run the Set-AzureVNetGatewayKey cmdlet on each of the VNets. Unfortunately, the RemoteApp VNet does not give a name to the Local Network. So, you have to grab the generated Shared Key from the RemoteApp VNet Gateway (just click the Manage Key button on the command bar and copy it from the Shared Key field) and pass it to the Set-AzureVNetGatewayKey cmdlet for the DC VNet Gateway.
- If everything is configured properly then the VNet-to-VNet connection should show as connected on the DC VNet Dashboard page. You’ll also see the Data In and Data Out start ticking up.
###Create a new Azure RemoteApp Hybrid Collection###
Now we’re ready to provision the Azure RemoteApp Hybrid Collection.
- Go back to the article How to create a hybrid collection for RemoteApp and follow the steps while noting the following:
- We’ve already created and uploaded the custom template image so you’ll simply link to the existing image
- We’ve also created the virtual network and established a Site-to-Site VPN (this was a VNet-to-VNet Connection in our case) so all you have to do is link to the existing virtual network
- Your AAD tenant and directory synchronization should already be set so you can skip those steps
- Publish the Notepad++ and Paint.Net applications and give users access
- Now fire up the Azure RemoteApp Client from your favorite device and give it a try
- You should see something like the following:
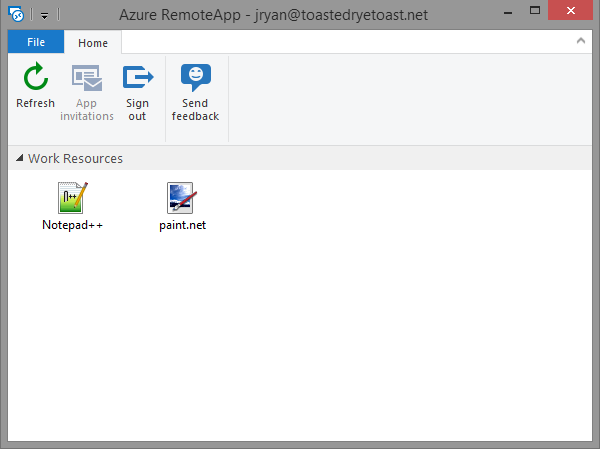
Well, it was a lot of work to get here. But hopefully the approach outlined above gives you a good understanding of how to deploy a dev/test Azure RemoteApp Hybrid Collection environment in Azure.
Cheers!